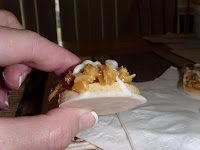
I only wish I had the words. These are now my #1 favorite cookie. Hands down. That's it. Call the game, folks. It's over.
I was ALWAYS head-over-heels for Samoas, and I will admit a part of me may have died when I found out I could no longer eat them (or it died during Girl Scout Cookie Season, at least). What better way to make lemonade outta lemons that to make your very own Girl Scout(ish) cookies that are WAAAAAAAAAY better? (No offense meant to anyone). I am a fool for caramel and a sucker for white chocolate. What do you get when you add those together and stick them atop a yummy shortbread cookie?? A sucker of a fool. A fool of a sucker. Either way - I'm in!
And I know...another sugary thing?? Well...when your husband returns from a month away of in-the-field training, it never hurts to have something super yummy to share when he gets home!
So, as I mentioned, this is my version:
INGREDIENTS:
- 1 bag of Schar Shortbread Cookies (approx. 30 cookies)
(I had to use two bags because I bought mine on clearance, and well...they were a lil mushed. However, I believe this was THE BEST clearance buy I have ever made. These shortbread cookies are a phenomenal way to make the base for your cookie, and they really are great by themselves. The next time I make these, I will probably try using Kinnikinnick S'moreables Graham Style Crackers for a different taste. There are other gluten-free shortbread cookie recipes you can try, but, in my experience, none come out crunchy. I am typically a staunch soft-cookie supporter, but for these lil babies, crunchy does the trick.)
Topping:
- 3 cups shredded coconut (sweetened or unsweetened)
- 12 oz. chewy caramels (make sure they're gluten free! Sometimes these are processed on the same equipment as other candies that contain wheat. If so, make the decision YOU feel comfortable with).
- 1/4 tsp. salt
- 3 TBL. milk
- 8 oz. white chocolate bark (you can use milk, dark, or white - whatever you want! You could use chips, but I prefer to use the baking chocolate/bark - it works the best for me)
DIRECTIONS:
- Preheat oven to 300 degrees.
- Spread the coconut on a baking sheet and toast for 15-20 minutes, stirring every 5 minutes to prevent any of the coconut from getting a sunburn! (NOTE: a baking sheet with sides is super handy here. If you stir the coconut without sides, it has a tendency to "run amuck." Can't have that.)
- While the coconut is toasting, unwrap the caramels (and try to refrain from eating too many of them. Or...just buy 14 oz. (which is what happened when I bought two 7 oz. bags) and properly dispose of the "extras")
- Put caramels, salt, and milk in a microwave safe bowl and melt on high for 3-4 minutes (stirring occassionally).
- When the caramel mixture is smooth, mix in the toasted coconut.
- Lay cookies out on wax paper.
- Top each cookie with 2-3 tsp (one spoonful in my terms) - BE CAREFUL! The mixture is H-O-T
- While the topping cools on the cookies, melt the white chocolate in a small bowl (I melted 3 squares of white chocolate bark. To prevent scorching, only heat the chocolate for 35-45 seconds at a time, stirring in between heating).
- Dip the base of each cookie in the chocolate.
- Place the cookies back on the wax paper.
- Using a spoon (or a ziploc bag with the corner cut out or a piping bag) drizzle remaining chocolate over the cookies.
- Let the cookies completely cool and the chocolate set and then dive in!
I think I might have already mentioned this, but these cookies are S-P-E-C-T-A-C-U-L-A-R in my book. For me, the white chocolate really tops it off. These store well in an airtight container in the fridge. I used to always like putting the Samoas in the fridge and eating them cold, so I don't mind! Beware, though: these can be a little hard to chew when first out of the fridge. I will absolutely be making these again, and again, and again. For those of you related to me: you WILL be eating these at the next family gathering :-D


